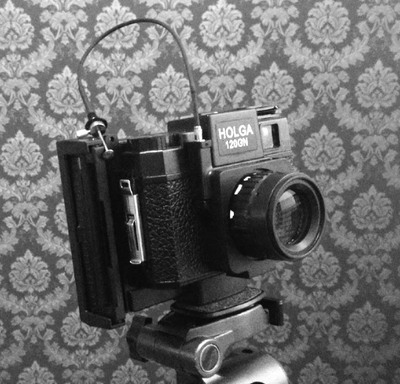
The instant Holga
Finally, my Holgaroid arrived in the mail, it traveled all the way from Hong Kong to my doorstep in The Netherlands. It came with the back (without film) and a diopter lens to correct for the new film plane distance, as with the instant back that moves a couple of millimeters backwards. It also comes with a new frame you can click into your Holga instead of the 6×6 or 6×4.5 But let me first start off with 2 questions and their simple answers.
Q: Polaroid doesn’t make film anymore, so why would I want one?
A: Correct they don’t but FujiFilm does and since instant film is still used in science labs they won’t stop making it tomorrow.
Q: I never shot instant film and I have no clue what film to use?
A: Fuji Film sadly discontinued their ISO 400 color and black and white film, which would have been perfect for the Holgaroid. But fear not, we have tricks up our sleeves. So there are three films still available:
- FujiFilm FP-100C Professional. Which is an ISO 100 color film
- FujiFilm FP-3000B. Which is a ISO 3000 Black and white film
- FujiFilm FP-100C Silk. Also, a ISO 100 film but with a satin finish
Metering and Corrections
Okay, let me start off with the simplest mod you can do. Are you ready? Here it goes: Don’t install the new frame! Now that was easy. Alright, I’ll tell you why. Holgaroids can’t do full frame FP film size, so your image will always land on the left side of the film when viewed horizontally. The reason is that the Holga lens can’t cover the entire frame (the Diana lens does cover the whole frame, here is a guide), so you get a round feathered image. Now, I don’t care too much about the round feathered image, but I really didn’t like the fact it was round and feathered on one side and a straight line on the other. The straight cut-off is caused by the frame they give you with it. Just don’t install the frame and it all looks even.
One of the first things I started sweating and stressing out about is how to figure out what to set my light meter to now. Usually you can get away with using an ISO 400 film and applying the sunny 16 rule, if it’s clouded all you do is throw it in flash/clouded mode and you can continue. **You can’t use your Holga this way anymore!
**When you move your film plain back it will affect your f-stop, when you stick something in front of your lens less light reaches the film plane. See the problem here? The Holgaroid does both… On top of that, we only get to choose between 100 ISO film and 3000 ISO film. If we had a 400 ISO film, we could have gotten away with only shooting on high noon and the camera set on its cloudy/flash setting, but we don’t have that.
ISO 100 Film
All isn’t lost! And to be honest, in some ways, it makes it even easier to shoot inside. Let me explain. So we lose a whole load of light due to the Holgaroid mod, then we load it up with ISO 100 film, which is also less sensitive. Because you’re loosing so much light, you can now actually count the seconds! The only thing you need is a tripod (and I would get the cable release mod as well, I have it, and it works very well).
Here’s how it works. Grab a light meter and set your Holga to the cloudy/flash setting. Normally that would make your Holga work on F16. I know there are a lot of posts out there that say it’s F8, they’re wrong, sorry. Anyway, due to the new distance of the film plane and the diopter lens, that turns out to be F32 now How’s that for crazy! Set your light meter to ISO 100 and keep cycling the shutter speed until the display says the F-stop is 32. In side on a cloudy day next to the window that will give you a shutter of 2 seconds more or less. Easy to count, no problem. So that takes care of the ISO color film. Let’s move on to the ISO 3000 film.
ISO 3000 Film
So this is cute, mega sensitive film! But now it will over expose on a sunny day in the Holgaroid and still under expose inside. Worse still, it won’t underexpose by much inside which means we can’t use a cable release as the shutter will still be n’th of a second, and we can’t really count that.
Okay, let’s go with outside first. The solution is really easy. When you get too much light at 100th of a second (the shutter speed of the Holga) make sure you get less light. You can go about this by just using an ND filter, but why not use a cheap black and white color filter, they eat up light as well, and you get to be a little bit more creative. Usually a stop or 2 on a sunny day with that camera on sunny setting is really more than enough. Red filters tend to eat away just that. If you don’t have a red filter that fits your Holga you can also just get a cheap gel. It really doesn’t matter much as the Holga doesn’t have a high quality lens anyway and let’s be honest, if you want images like that you’d probably not be shooting with a Holga to begin with.
Inside the same trick works, but I’d use a ND filter, you want to get into the second(s) range again, so you can count off your own exposure time. Pretty straight forward really.
Flash
Flash with the Holgaroid works well when you want some fill flash and/or fixing people into place. I use an external flash for this, as I seriously doubt that the build in Holga flash is strong enough to do even that (I own a flash less model, so this is pure speculation on my part). You have to experiment a bit with flash to see what it does for you. But I can already tell you if you don’t have something like a mega flash unit but rather a simple hot shoe flash, just start by giving it two flash exposures and see what you get.
Conclusion
I realize that instant film isn’t the cheapest thing out there, so I imagine that at the price of a Holgaroid and the cost of figuring these things out, most people just decide to skip this project all together. However, it’s a lot of fun and often the results are really wonderful. So if you’re considering getting one, and you’re reading this, I’d say go for it! With the information supplied here, I’ve saved you a pack of film, it cost me about 10 shot to get all exposures and numbers figured out.
If you want to support Polaroid and instant film, have a look at http://www.polaroidconversions.com/ as long as there’s a community and a healthy user base, we can keep having fun with this.
For more basic information on shooting with Holga cameras, you can read this article